Visualise your Interior Design project – before it even begins

HOW WOULD YOU LIKE TO SEE YOUR FINISHED INTERIOR DESIGN PROJECT - BEFORE IT EVEN BEGINS?

Digital mockup of His and Her sink unit
Digital mockup of new toilet area

As professional Interior Designers, we meet a wide group of clients. Every now and again, we meet clients who have never worked with an Interior Designer and who, not surprisingly, have some thoughts/worries/ concerns about the Interior Designer relationship and how things might work out.

We understand that. How the Interior Design process works can be a complete unknown (perhaps even slightly daunting). 

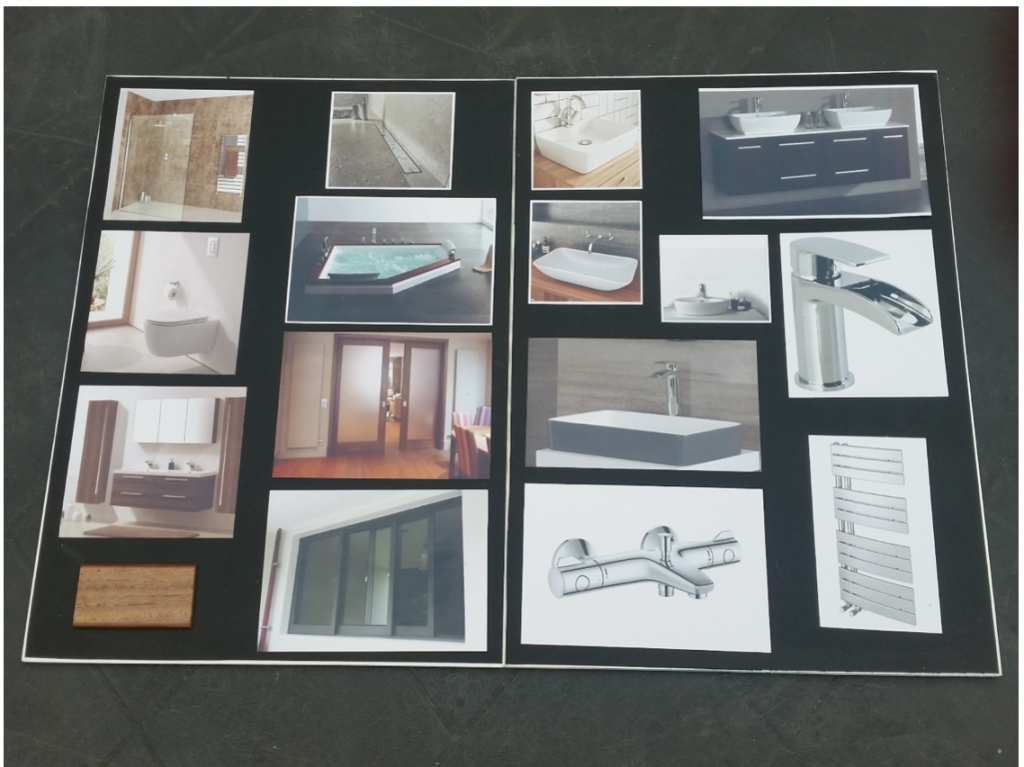
Fortunately, we have developed a way in which the end result of an Interior Design process can be seen long before its inception.

In this blog post, we use one of our recent projects to explain how this process works. We hope to demystify the design process, but most importantly, highlight how finished projects can be seen – before they are started.    

The particular project included the building of a new single-storey extension to an existing four-bedroom house. For this blog, we give particular attention to the detailed internal specifications and the inclusions of all the new bathroom features worthy of such a lovely and progressive project.

To provide some background information for our readers, at the start of each project we naturally explain to our clients the overall design and liaison process stage by stage.

INITIAL CONSULTATION

As always with all our design projects, this one began with initial client consultations to enable us to establish the client’s aspirations – and, just as importantly, as an exercise for us to explore all the potential possibilities for improvement to the property.

Our thoughts on possible improvements were primarily considered around:

  • our client’s lifestyle
  • the most efficient space planning and functionality
  • and of course the most aesthetically pleasing Interior Design possible within all identified parameters.

Additionally, we considered which extension configuration would best meet the Local Planning Authority regulations and would be most likely to increase the property’s value.

SPACE PLANNING

As a result, a sketch floor plan was drawn up to scale as seen below. The new build outline sections are shown in red.

House Extension Sketch- Interior design process

This sketch shows that, in essence, we agreed an enlargement of the existing Study, together with a reconfiguration of the En Suite Bathroom and a completely new Dressing Room/Walk in Wardrobe.

For the bathroom we needed to select and specify the exact items that would appear in the finished project and they included:

  • Wall hung double vanity unit with hand basins
  • Hand basin taps
  • Bath style
  • Bath taps
  • Shower screen
  • Shower head and body jets
  • Radiators
  • Underfloor heating
  • Wall hung WC
  • Lighting
  • Door and window styles
  • Wall hung storage units
  • Mirrors and so on
Computer generated bathroom redesign mockup

To illustrate our initial thinking process on specifying the above items, we have reproduced below some of our early options.

Selection of materials for Interior Design project

DESIGN DIRECTION - INTERIOR DESIGN MOODBOARDS

Following that agreement and after formulating the basic layout plan and dimensions, we then began the internal design and specification process. Working closely with our Client we firstly selected all the new items essential for a fully functioning, state of the art new shower room/bathroom.

At this stage we left the new wardrobe/dressing room to be dealt with separately later.

Working along our usual procedure, the next stage was to give our client an impression of the direction in which the overall scheme was heading.

To do so, we presented them with a series of sample boards. This is often a useful process to help narrow down more specifically the particular elements to be used.

To illustrate this process, one of those sample boards, is shown here.

Moodboard for Bathroom Interior Design

DESIGN DIRECTION - CHOOSING MATERIALS

The next stage was to identify the main finishes to be used.

Aiming for a very crisp overall design and considering our Client’s preference for a minimalist effect in this context.

Example of materials for bathroom interior design

Large 900mm x 600mm stone effect porcelain tiles for the flooring. Marble effect (seamless) wall panels throughout. These will be combined with walnut timber for the cabinetry. 

Again, a simple presentation board to confirm these finishes with the Client, as seen here.

DESIGN DIRECTION - LIGHTING DESIGN

Site dimensions and layout were established early on, all fitments have been chosen at this stage and surface finishes have been selected – the next stage was an outline lighting and ceiling plan. 

Lighting Plan

PRESENTATION - DESIGN VISUALISATION

With all the elements gathered together, the CAD rendering process began using specialist software developed for this purpose.  

Digital mockup of new built in bath unit

This firstly involves identifying the most advantageous photo angles.  To those views every actual item and exact finish is applied to the render, all drawn in the correct positions and each shown to their correct scaled dimensions.  The result of that dedicated process is a set of images as seen here.

A bathroom shown exactly how it will be when finished – before work on site has even begun.

 To further illustrate just how this CGI rendering worked so well for our client on this project, we have put five more camera angle images below showing the ‘finished’ bathroom. 

Computer mockup for new bathroom interior design
Computer generated bathroom redesign mockup